Working for an IT consultancy I am mostly helping out clients getting their software development projects right. A typical situation that I encounter at customer site is this:
So you want to set up your development environment, right? Umm, ok, first install A,B,C, tweak some configuration file here, don’t forget to set an env var there, and then it should just work.
Nope, it does not. And it gets even further…
Oh, it does not? Maybe you need a newer Java, let’s try that. Ummm, still not working, have you installed all the Eclipse plugins that Bobby has? Hmmm, which version of the plugins did you install? I remember Alice used an older version of the foo plugin there and had to set an absolute path to the baz installation somewhere. Ohy yes, baz requires bar as a prerequisite, so you should install that as well. WTF, still not working?! So why don’t you just copy over Bobby’s whole Eclipse directory, maybe this will do the trick…”
Eeeek. Congrats. You have run into a perfect example of the “works on my machine” syndrome.
But we can do better, so lets fix that!
Two Ways for Fixing “Works on My Machine”
In order to fix the “works on my machine” issues you need to ensure that every developer has an isolated environment that is specifically tailored for the given project.
Two common approaches to that are:
- Using a VM with all software pre-installed (bonus points for distributing a Vagrantfile rather than raw VM images)
- Using a “DevPack”, which is simply zip package containing all required software. No installation, just extract and start hacking.
The VM Approach
Using VMs for isolated development environments is probably the most commonly known approach, so I will not discuss it much further here. There are pros and cons of using VMs, e.g. the level of isolation that you get vs. the performance penalty due to runtime overhead of the hypervisor. There are more leightweight alternatives such as linux containers, but they work only under Linux and not all distributions are supporting them.
In the simplest case the VMs are distributed as large binary image files (typically .ova format), which are nothing more than a hard disk image plus some metadata describing the VM configuration.
If you want to keep this manageable and reproducable though (think of shipping updates for the development environment) you should use configuration management tools such as Chef or Puppet. Both integrate neatly with Vagrant which provides a common interface for dealing with VMs.
The DevPack Approach / DevPack Philosophy
A completely different yet more lightweight approach is to use so-called “DevPacks”. Not sure if anybody else calls them so, but at least I do and I also have a clear definition of what “DevPack” means to me (if you have a better name for it let me know ;–)).
So this is how I define a DevPack and what can be summarized as the “philosophy” behind a DevPack in terms of the three rules below.
Rule #1: Self-Contained Package
A DevPack is a simple, self-contained .zip (or .tar, .7z, whatever) package. It contains:
- all required software that you need for developing
- a
mount.batscript which mounts the current directory to a designated drive letter - a
set-env.batscript that sets the%PATH%and other env vars accordingly - a dedicated
%HOME%directory so it will not interfere with your actual home directory (isolation is king!) - a workspace containing the repos / source code you work with
Rule #2: No Installation – Just Unzip, Mount and Code
In order to use a DevPack:
- you unzip the DevPack to a directory on your system
- you mount the contents of that directory to a designated drive letter via the
mount.batscript - you run a
set-env.batwhich sets the environment - you start hacking
There is no installation involved, just unzip, mount and start hacking.
Rule #3: Isolation – Everything on the Mounted Drive
This means that everything happens within the mounted drive, i.e. any software that is contained within the DevPack:
- should not make assumptions about any specific software being installed on your system
- should not make assumptions about any other files being present outside the mounted drive
- should not write files to anywhere outside the mounted drive (thus the dedicated
%HOME%directory)
Yes, this does not come for free, and you have to ensure that all software bundled within the DevPack is properly configured so that it does not reference anything the mounted drive.
And yes, relative paths should be used whenever possible, but at some point in time you will need to set an absolute path somewhere and in that moment you will be happy that everyone in your team shares the same paths because the DevPack is mounted to a common designated drive letter.
A Java DevPack Example
This was quite much text, so let’s look at at an example now, which is taken from the last Java project I was working on.
Once the DevPack zip file is unpacked the content / structure of it’s root directory looks like this:
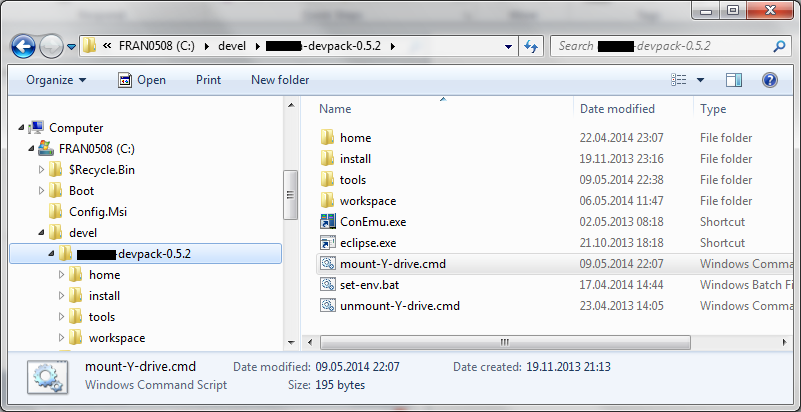
First of all, you should run the mount-Y-drive.bat script located at the root of the DevPack. Once you have run it the Y: drive will be mounted and pointing to this directory. The script looks like this:
1 2 3 4 5 6 | |
Btw: the inverse unmount-Y-drive.bat script is even simpler:
1 2 | |
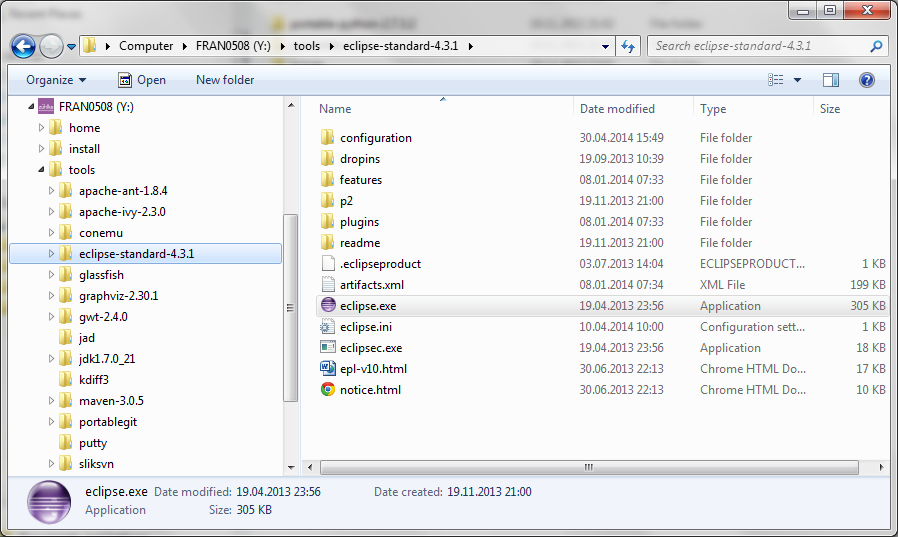
Now, looking at the Y:\tools directory you can see which software is part of this DevPack:
- it starts with a specific JDK version
- includes Maven, ant, ivy for the build and dependency management
- contains a pre-configured Eclipse IDE (with any plugins preinstalled)
- the GlassFish application server
- command line tools such as svn, git, putty
- and finally a better windows console (ConEmu)
Finally, putting all the pieces together, you need the set-env.bat script which ensures that the DevPack local binaries are in front of the %PATH% and sets some other env vars:
1 2 3 4 5 6 7 8 9 10 11 12 13 14 15 16 17 18 19 20 21 22 23 24 25 26 27 28 29 30 31 32 33 34 35 | |
The above script is automatically run whenever you launch either the ConEmu.exe.lnk or eclipse.exe.lnk shortcuts. The shortcut targets had to be adjusted to make this work:
- for eclipse:
Y:\set-env.bat && Y:\tools\eclipse-4.3.1\eclipse.exe -data Y:\workspace - for ConEmu:
Y:\tools\conemu\ConEmu.exe /cmd cmd /K Y:\set-env.bat
Whenever you are working in another command shell remember that you have to manually call the set-env.bat script in order to have the environment properly set up.
In any case, you have now made sure that any executables within the DevPack are front of the %PATH% and thus preferred over whatever you have otherwise installed on your system. You also made sure that Maven will download it’s depenencies to Y:\home\.m2 rather than “infecting” other parts of your system outside the mounted drive.
More DevPacks
Well, by now you should have a good enough idea of what a DevPack is and what its benefits are. You have seen an example for a Java DevPack above, but you could have DevPacks for any project or programming language.
In fact I am currently writing this blog post using Octopress which I have set up with a general purpose Ruby DevPack. For working with Chef and Vagrant I’m using the Bill’s Kitchen DevPack.
So what are your “DevPacks”?